Choosing Your First Aircraft Model Kit: A Beginner's Guide and Five Recommended Kits
Choose your first aircraft model with confidence: a practical guide to scale, tooling, painting and five recommended kits for new and returning modellers.
The Ancient Geek · · 16 min read
Top tips
Before buying anything, download and review the instructions on scalemates.com. Check that the instructions look like something you can understand and work with.
Search YouTube for build guides of your chosen kit - there's a good chance someone has made a review or the full build of the kit. The more recent, the better but don't get caught up in the "super detailing" that some modellers like to do. That's optional and just something you may want to aspire to in the future.
Your first aircraft model should leave you pleased with what you have made and keen to build another. Choosing a kit that suits your space, budget and confidence makes that much more likely.
Before being swept away by the box artwork, think about three things: the scale, the age and quality of the kit's design, and how demanding it will be to paint. A modest model that fits together well can teach you far more, and give you much more pleasure, than a spectacular kit that becomes a battle from the first evening.
Your first model is about learning and enjoying yourself
The purpose of your first model is to get comfortable with the hobby: learning how to follow a manufacturer's instructions, finding your way around the common tools and discovering how glues and paints behave. Instructions vary considerably between brands, so take time to understand the symbols, part numbers, paint references and assembly drawings in the box you have chosen. Nobody starts out knowing what every little arrow means.
You do not need to produce a museum-quality masterpiece. Aim for something you are happy with, enjoy the process and let each build teach you something useful. A visible join or an imperfect paint finish does not cancel out the pleasure of making an aircraft with your own hands.
A friendly warning if you share photographs on social media: alongside the encouragement, you may encounter the so-called “rivet-counters” — people who scrutinise minute details and insist on absolute historical accuracy, right down to the precise shade of paint. Some advice will be helpful; some comments may be unnecessarily caustic. Enjoying detailed research is a perfectly good part of the hobby, but it does not give anyone permission to spoil somebody else's enjoyment.
Take useful suggestions when you want them, and leave the unkind remarks behind. This is your model. If you are happy with it, that is what matters most.
First, choose a scale that suits you
Before choosing an aircraft, think about the scale you want to build. It affects how much room you need, how comfortably you can work and how much the hobby is likely to cost.
What does scale actually mean?
Scale describes the relationship between the model and the real aircraft. At 1:48 scale, every measurement is divided by 48. One millimetre on the model represents 48 mm on the real thing. You will also see this written as 1/48; it means exactly the same thing.
The smaller the number after the colon, the larger the model. A 1:24 aircraft is therefore much bigger than the same aircraft at 1:72.
For an imaginary aircraft with a wingspan of 12 metres, the difference looks like this:
1:144 scale: About 83 mm wingspan. Compact; particularly useful for airliners and large aircraft, but small fighters can be fiddly.
1:72 scale: About 167 mm wingspan. Space-saving, generally affordable and an exceptionally broad choice of subjects.
1:48 scale: 250 mm wingspan. A useful balance of manageable size, visible detail and cost.
1:35 scale: About 343 mm wingspan. Available for some aircraft, especially helicopters; mainly associated with military vehicles.
1:32 scale: 375 mm wingspan. A common larger aircraft scale, requiring more workspace and display room.
1:24 scale: 500 mm wingspan. A substantial display model, often with a higher price and a more involved build.
The main aircraft scales to look out for are 1:144, 1:72, 1:48, 1:32 and 1:24. You will also encounter 1:35 aircraft kits, particularly helicopters, but 1:32 is the more established choice for larger fixed-wing aircraft. (see scale references below).
What should influence your decision?
Your workspace. You need room for the model, its loose parts, the instructions and your tools. Think about whether you can leave a project safely on a bench or need to pack everything away after each session. A large model can become awkward to turn, paint and protect on a small table.
Storage and display space. Measure your shelves or cabinet before buying. Check both the finished wingspan and the length: a model may fit across a shelf while its tail or nose sticks out. Leave room to lift it in and out without catching delicate parts. You will also need somewhere safe for the unfinished model between sessions.
Eyesight and handling small parts. If tiny components are difficult to see or grip, a 1:48 aircraft may be more comfortable than a comparable 1:72 kit. Good lighting and, if helpful, magnification can make a real difference. Larger kits can still contain very small parts, however, so inspect the contents and instructions rather than assuming that a bigger box guarantees an easier build.
Cost. For comparable subjects and levels of detail, smaller kits generally cost less and use less paint. Larger models can also need larger storage boxes or display cases. Allow for paints, adhesive and a few basic tools as well as the kit itself. There are exceptions: a highly detailed small kit can cost more than a straightforward larger one.
The aircraft you want to build. Scale alone does not determine the finished size. A 1:72 four-engined bomber can occupy considerably more room than a 1:48 single-engine fighter. Always check the actual dimensions.
Is 1:48 or 1:72 the better starting point?
For many new modellers, 1:48 is an excellent compromise between size and cost. It gives you a useful amount of room to work, details are easier to see and a single-engine fighter is still a manageable display size. If eyesight or handling tiny parts concerns you, it is a particularly sensible place to start.
1:72 remains the most popular aircraft modelling scale, with generally lower prices and a vast choice of subjects. It is especially appealing if space is limited or you would like to build a varied collection. Just remember that a small model is not automatically an easy one.
There is no need to commit to one scale forever. Choose a scale that suits your circumstances, then find a well-designed beginner kit within it. The simplified 1:72 Spitfire recommended below earns its place through its approachable design; the larger Tamiya P-47 offers a different route for those who prefer 1:48.
Choose a reasonably modern tooling — not just a new box
One of the best ways to make your first build more enjoyable is to check when the kit was originally designed.
“Tooling” means the moulds used to make the plastic parts. A manufacturer can keep using the same moulds for decades, releasing the kit with fresh artwork, different markings or a new product number. A recent release date on a shop listing does not necessarily mean newly designed plastic parts.
Aircraft kit design and manufacturing have advanced considerably, particularly through the 2000s and beyond. Computer-aided design, improved research and, for some projects, scanning of real aircraft give designers better ways to reproduce shapes and plan how parts fit together. For a first purchase, a well-reviewed tooling dating from around 2000 onwards is a useful starting filter. It is a practical guide, not a magic cut-off date. [1]
Why does the age of the design matter?
Older designs can have less precise locating points, more awkward joints, thick transparent parts or simplified detail. Some require more filling and sanding to make adjoining surfaces meet neatly.
You may also encounter flash: thin, unwanted fringes of plastic around a part, rather like a little film or web along its edge. It forms when plastic escapes into gaps between the mould surfaces. It needs trimming or sanding away before assembly and can stop parts fitting properly. Worn moulds can contribute to it, although production conditions also matter and new kits are not immune. Airfix itself flags possible flash on its Vintage Classics range. [2]
More recent toolings often offer cleaner detail, better-planned assembly and improved shapes. They do not guarantee a trouble-free build or perfect accuracy. Some modern kits divide an aircraft into a great many delicate pieces to reproduce every detail; that can make them less suitable for a beginner than an older, straightforward design.
Look for a proven, uncomplicated build with good fit. Tooling age helps you find one; a build review tells you much more about what actually happens at the workbench.
Use Scalemates to see what is really in the box
Scalemates is an excellent reference for checking a kit's history. Search using the manufacturer and exact product number, then look at its Product timeline.
New tool: A newly tooled kit at that point in the timeline.
New parts: Some components have changed; the kit may still share older tooling.
New decals: Different transfers or marking options; the main plastic parts need not have changed.
New box or Rebox: A packaging or reissue change; follow the timeline back to find the original tooling.
Follow the connected history back to its origin, rather than assuming the newest date is the tooling date. For example, the Airfix Typhoon A02041B is a 2024 boxing with new decals, based on the 2013 tooling. Tamiya's A6M2b Zero 60780 is listed as a 2012 new-parts release within a tooling family introduced in 2012. Both are useful distinctions when comparing apparently similar boxes. [3–4]
Scalemates also links instruction downloads and reviews where available. Check that an instruction sheet matches the edition you intend to buy.
What about decals?
Decals are the markings that slide off a backing sheet after soaking in water. Newer releases can benefit from finer printing, better colour alignment and improved carrier film — the transparent material around the printed design. They can make a real difference to the finished model.
However, newer does not automatically mean easier. Very thin decals can be delicate; thicker ones may be more forgiving to handle but need more help settling over surface detail. A recent reboxing of an older kit can contain excellent new decals, while a modern tooling can have a disappointing sheet.
If buying an old second-hand box, inspect the decals for yellowing, damage or cracking. Storage conditions matter as well as age. For your first kit, a recent production box with favourable comments about its decals is a sensible choice.
Choose the finish as carefully as the aircraft
The easiest aircraft to assemble is not necessarily the easiest to paint.
An overall colour or a straightforward upper-and-lower scheme is a helpful introduction. Elaborate camouflage, yellow wings, bright recognition stripes and polished metal finishes ask more of you. Metallic paint in particular makes scratches and untidy joins conspicuous.
Look at the canopy too: the transparent cockpit cover. A small canopy with numerous frames can take more patience to paint than a much larger, simpler one.
You can brush-paint any of the choices below. An airbrush is optional equipment, not an entry requirement. Choose paints intended for brush use and follow the maker's thinning and drying guidance.
Five aircraft kits worth considering
These are research-based recommendations, not claims that I have personally built and compared all five. Scalemates was checked for kit identity and tooling history, alongside manufacturer information, available instructions and published kit inspections or builds. The order reflects different routes into the hobby: choose the entry that matches your priorities.
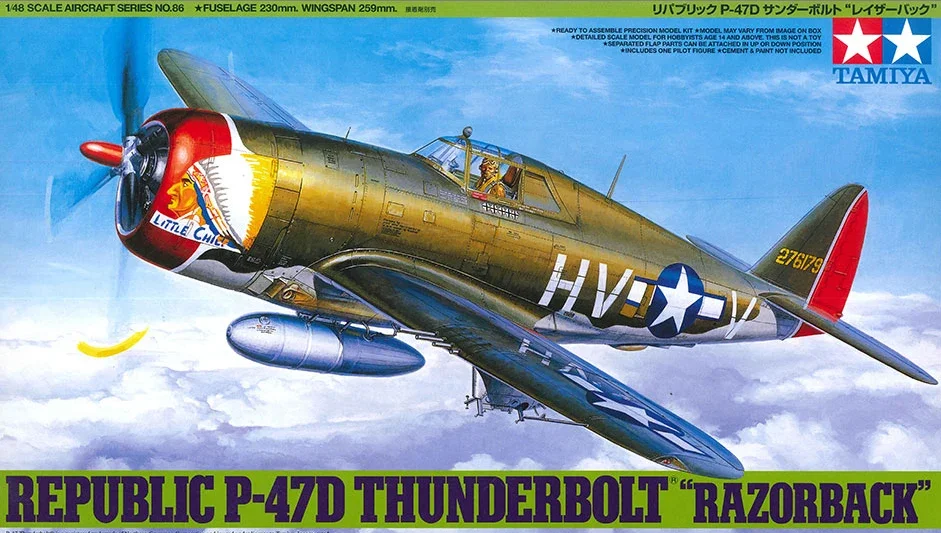
1. Tamiya P-47D Thunderbolt “Razorback”, 1:48, 61086
Tooling background: 2002 new tool.
Best reason to choose it: My main 1:48 recommendation for a patient adult beginner.
Main challenge: More parts and a larger footprint.
2. Airfix Spitfire Mk.Vc Starter Set, 1:72, A55001
Tooling background: 2020 new tool.
Best reason to choose it: The simplest starting package here.
Main challenge: Curved camouflage boundaries.
3. Tamiya A6M2b Zero, 1:72, 60780
Tooling background: 2012 tooling family; this variant introduced with new parts in 2012.
Best reason to choose it: A restrained main paint scheme.
Main challenge: Small cockpit parts and canopy frames.
4. Airfix F-35B Lightning II Starter Set, 1:72, A55010
Tooling background: 2023 new tool.
Best reason to choose it: A purpose-designed introduction to modern jets.
Main challenge: Assembly order and configuration choices.
5. Airfix Hawker Typhoon Mk.IB, 1:72, A02041B
Tooling background: 2013 tooling; 2024 new-decals boxing.
Best reason to choose it: A conventional British fighter kit with room to learn.
Main challenge: Camouflage, small fittings and attachment-point clean-up.
1. Tamiya P-47D Thunderbolt “Razorback” — my main 1:48 choice
Product number: 61086
Finished wingspan: approximately 259 mm
If you like the idea of starting in 1:48, this is a stronger recommendation than choosing a kit simply because it has fewer parts. It gives you larger components and a conventional construction sequence, with a good record of buildability. A published build of this exact kit praises its engineering and reports trouble-free assembly. [5–6]
Construction and instructions: The sheet provides numbered stages, detail views and clearly identified alternatives. Choose marking option A or B before starting: some component choices depend on it. This is a project to enjoy over several sessions.
Painting: Both marking choices use olive-drab upper surfaces and neutral-grey undersides, avoiding an all-over metallic finish. There are still recognition bands and smaller details to tackle.
Decals and cautions: The build review describes the transfers as well printed but relatively thick. They are usable; do not expect every marking to disappear into the surface without care. The model also takes up noticeably more room than a 1:72 Spitfire.
Who should choose it? A patient beginner who wants a larger, detailed first aircraft and is comfortable buying paints and glue separately. If minimum assembly is your priority, choose the Spitfire below.
2. Airfix Spitfire Mk.Vc Starter Set — the easiest starting package
Product number: A55001
Scale: 1:72
Parts: 26
This particular Spitfire was designed as a simplified starter kit. It includes acrylic paints, glue, a brush and a display stand. Check the product number: other Airfix Spitfires can have substantially different construction. [7]
Construction: The low parts count lets you concentrate on removing parts neatly, checking joints and applying glue sparingly.
Painting: The camouflage's curved boundaries are the main challenge. Brush painting is entirely reasonable; take your time and build up coverage in controlled coats.
Instructions and support: Airfix provides a step-by-step video for this exact set, useful when you want to see an assembly from another angle. That support is a considerable advantage for a first-time builder. [8]
Decals and cautions: The single marking option keeps decisions manageable. Handle the small projecting details carefully and keep paint off surfaces that will be glued together.
Who should choose it? Someone seeking a short shopping list and the gentlest introduction in this selection. Its simplified design is why it qualifies, rather than its small scale alone.
3. Tamiya A6M2b Zero — a good choice for simpler overall painting
Product number: 60780
Scale: 1:72
Finished wingspan: approximately 167 mm
This is a conventional detailed kit with cockpit components and three marking choices. Its predominantly light grey-green exterior makes an appealing alternative to multicoloured camouflage. [4,9]
Construction: Expect more delicate work than in the simplified Spitfire. Painting the cockpit before closing the fuselage — the aircraft's body — provides a useful introduction to planning ahead.
Instructions: The inspected sheet uses orderly numbered stages, detail views and paint references beside the relevant parts. Pay attention to component orientation and read the alternatives before committing to glue. [10]
Painting: Most exterior surfaces share a main colour, but the engine cowling and smaller areas need separate attention. Follow the supplied colour guidance without feeling obliged to solve every historical paint debate on your first build.
Decals and cautions: Use the supplied national markings rather than adding the complication of painting them. The many narrow canopy frames are the biggest qualification to its “simple paint scheme” appeal.
Who should choose it? A careful beginner who has chosen 1:72 and prefers a restrained exterior scheme, with the patience for small details.
4. Airfix F-35B Lightning II Starter Set — best for a modern jet enthusiast
Product number: A55010
Scale: 1:72
Parts: 42
If present-day jets excite you, start with one. This purpose-designed beginner kit is a more appropriate introduction than a highly detailed jet packed with separate weapons, engine components and open panels. The set includes paints, brushes, cement and a stand. [11]
Construction: A kit inspection describes simplified assembly, clear instructions and a separate beginner hints sheet. It also highlights moulding stubs that must be removed and an underside assembly that needs fitting before the main body is closed. [12]
Instructions: Choose the flight or hover configuration at the beginning and follow its steps consistently. Treat the sequence as part of the design.
Painting: The predominantly grey exterior avoids curved camouflage, but broad surfaces still need even coverage. Use the supplied painting guide for your first build rather than adding elaborate panel shading.
Decals and cautions: The low-visibility markings are small and subtle. Do not judge progress by how dramatically they transform the model.
Who should choose it? A newcomer whose interest lies with modern aircraft. Enthusiasm counts, and this kit gives that enthusiasm a manageable outlet.
5. Airfix Hawker Typhoon Mk.IB — a more involved conventional first build
Product number: A02041B
Scale: 1:72
Parts: 74
The Typhoon is my conditional fifth choice for someone who wants a conventional British fighter kit and is happy to take a little longer. Its 2024 boxing adds new markings to the 2013 design. It is not the same tooling as the much older Airfix Typhoon. [3,13]
Construction: A published build of the earlier tooling reports generally good fit and straightforward assembly, with some filler needed at joints. It also flags delicate landing gear. That is useful evidence about the shared plastic, rather than a test of the newer decals. [14]
Instructions: Read ahead for weapon choices and any holes that need opening before the wings are joined. Leave the gun-access panels closed on a first attempt: opening them adds cutting and extra work. The exact A02041B instruction download is linked on Scalemates; my assessment of buildability also draws on the earlier tooling's published build and inspection. [3,15]
Painting: Green and grey camouflage, lighter undersides and smaller recognition markings give you more to do than on the Zero. Examine the two supplied schemes before choosing.
Decals and cautions: A02041B has different decals from earlier releases, so reports about those sheets cannot establish how the current ones behave. Remove the attachment-point remnants carefully and let the landing gear joints set before standing it upright.
Who should choose it? A patient beginner attracted to the Typhoon itself. If you want the least demanding first project, pick the Spitfire starter set.
A few useful tools, then time to enjoy the build
A modest starting kit is enough:
Small model side cutters for removing parts from their plastic frames, called sprues.
A fine sanding stick for tidying attachment points and small mould lines.
Tweezers for parts that are awkward to grip.
Plastic modelling cement, suitable brushes and the paints needed for your chosen scheme.
A small amount of glue intended for clear parts, to reduce the risk of marking the canopy.
Starter-set supplies reduce that list, but you will still need a way to remove and tidy the parts. Use cutting tools carefully and solvent-based glue in a well-ventilated space.
Before applying adhesive, read the instructions from beginning to end. Identify the paint scheme, alternative parts and anything that must be painted before it disappears inside the aircraft. Try the main joints without glue — dry-fitting — and remove any obstruction rather than forcing them.
Keep your first finished aircraft. It will remind you how much you have learnt, and it deserves its place on the shelf just as much as anything you build later.
Choose something you like, make it your own and enjoy it. This is your model.
Sources and research notes
Checked 2 November 2026. Scalemates entries and timelines were read through the connected browser. Tooling history identifies kit origins; it does not independently establish fit, accuracy or decal performance. Recommendations are editorial judgements based on the evidence described, not comparative hands-on testing. Prices are omitted because total cost depends on supplies and retailer; check stock and the exact product number before buying.
Cybermodeler: Tamiya 61086 build, including decals and variant choices; manufacturer's instructions; Tamiya dimensions and product details
Airfix A55001 product details; Scalemates: 2020 new-tool entry
Airfix F-35B A55010 product details; Scalemates: 2023 new-tool entry
Model Kit World: build of the earlier Airfix A02041 Typhoon tooling
HyperScale: inspection of Airfix A02041, including construction options
Scale background: Regina Scale Modellers' aircraft guide and Access Models' scale guide.